


In this exercise, I investigated failed authentication attempts with Splunk to detect potential threat actors attempting to gain access to the environment. This exercise is divided into three parts: Detection, Validation, and Scoping.
I found this resource in my quest for some hands-on labs with Splunk. You can find lab here: Introduction to Splunk
Let's dive in!
Detection
I began by searching for events that have reference to password failure by searching for fail* password.
The wildcard or asterisk (*) allows me to get results for any event that contains fail, including fails, failed and failures for password.
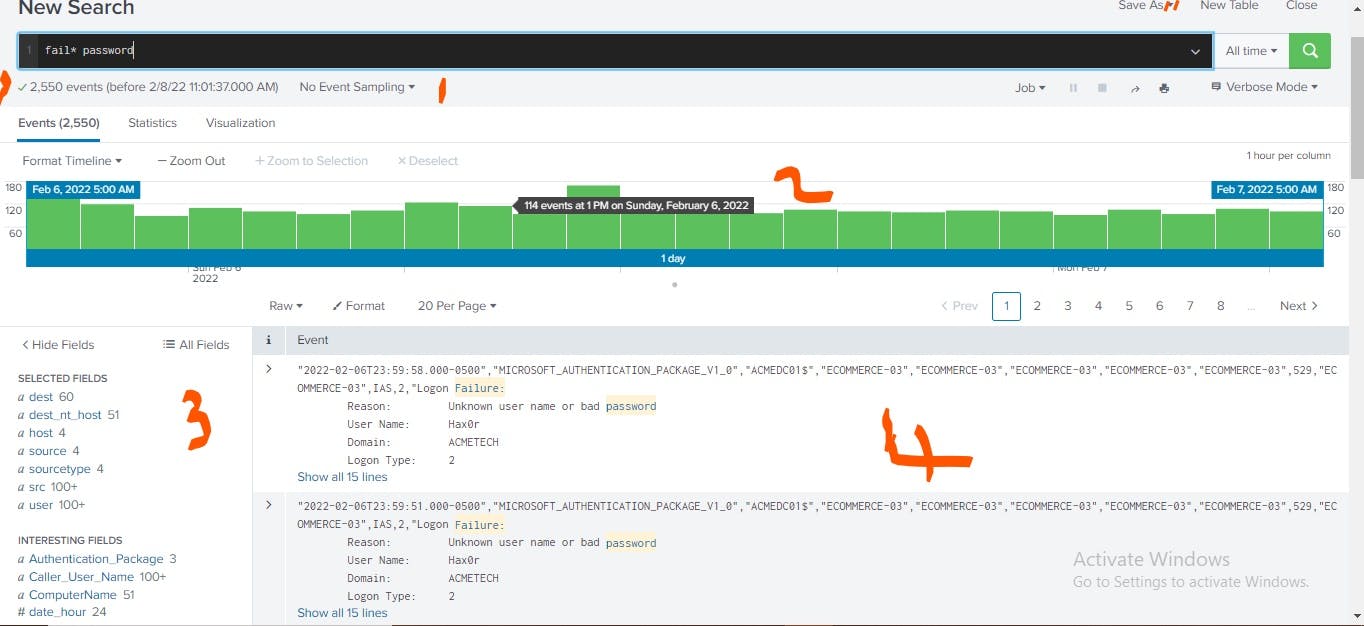
The result showed that there were 2,550 failed authentication attempts. The histogram of event (in the part labelled 2) shows the event timeline. The Fields sidebar (the part labelled 3) shows the selected fields and interesting fields. The part labelled 4 shows the events with the matching search terms highlighted. The event view by default lists the most recent event first.
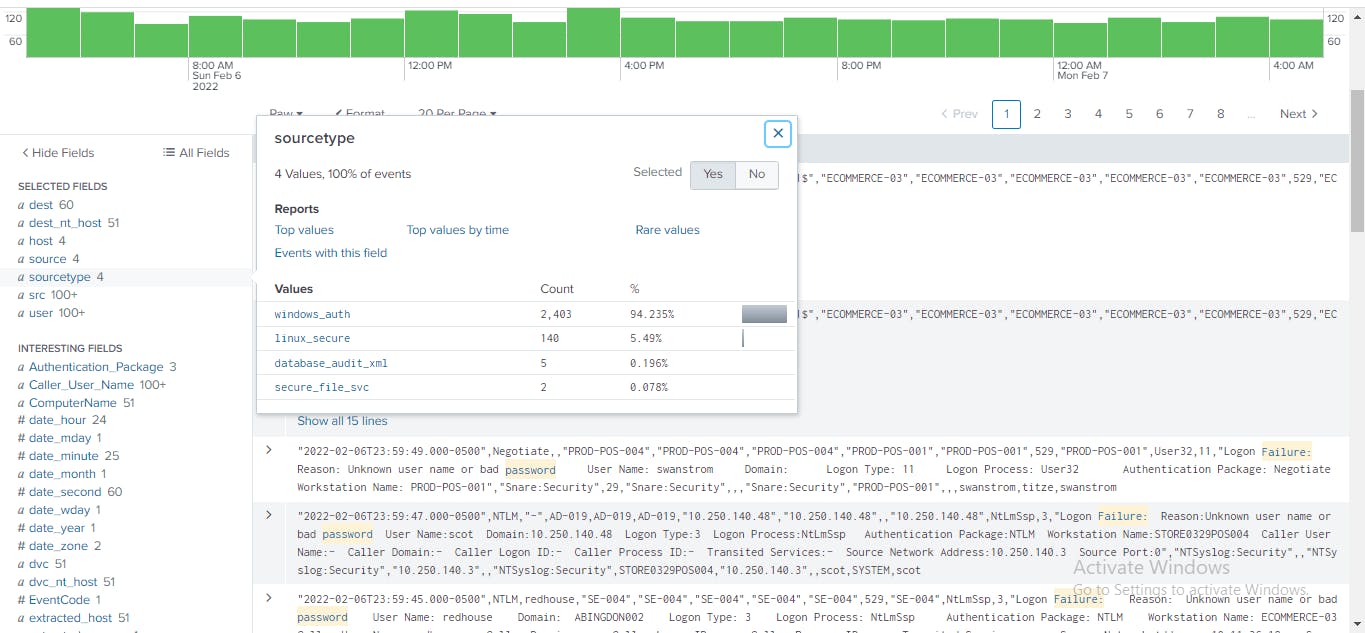
In the Fields sidebar, I clicked the sourcetype to learn more about the type of systems involve in the authentication failure. This output showed that the authentication failures occurred on Windows, Linux, database, and
file server systems. I clicked Yes to add it to the selected fields.
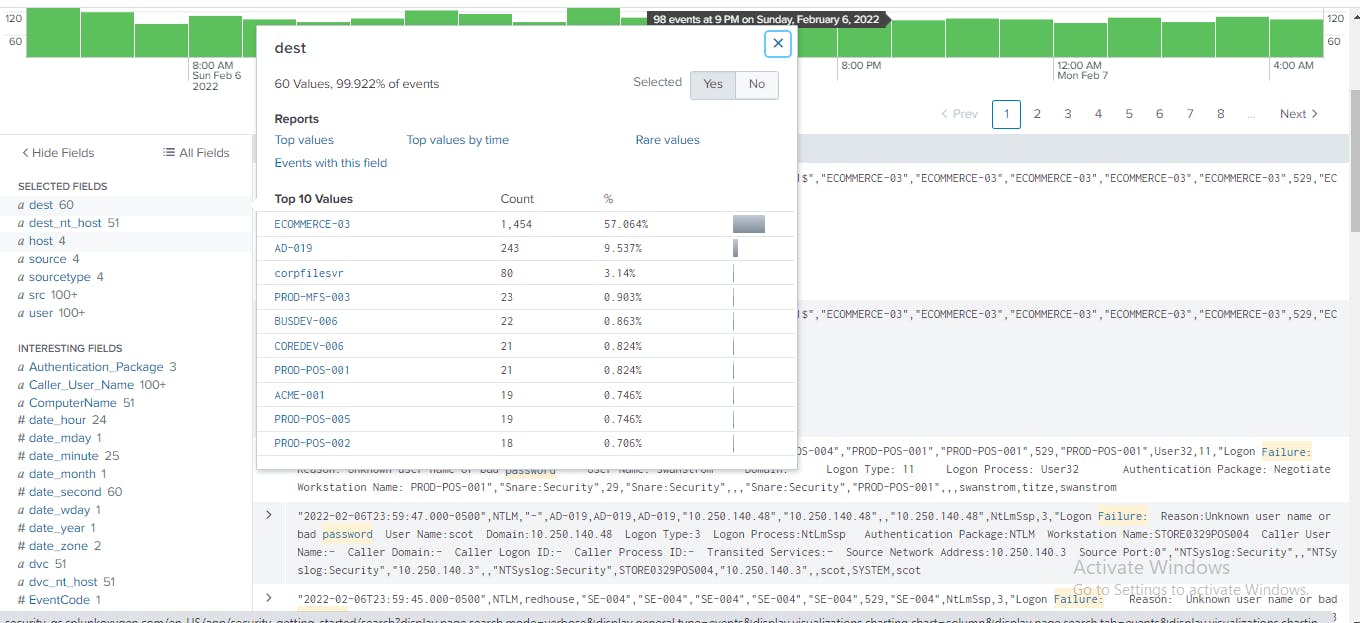
Next, in the fields sidebar, I click dst to know the systems the failed access attempts are happening? The display shows more than 60 different hosts being accessed by the assets in the environment. The destination
ECOMMERCE-03 has 1, 451 authentication failures, the server
AD-019 has 243 authentication failures, among other hosts that show authentication failures. I clicked Yes to add it to the selected fields.
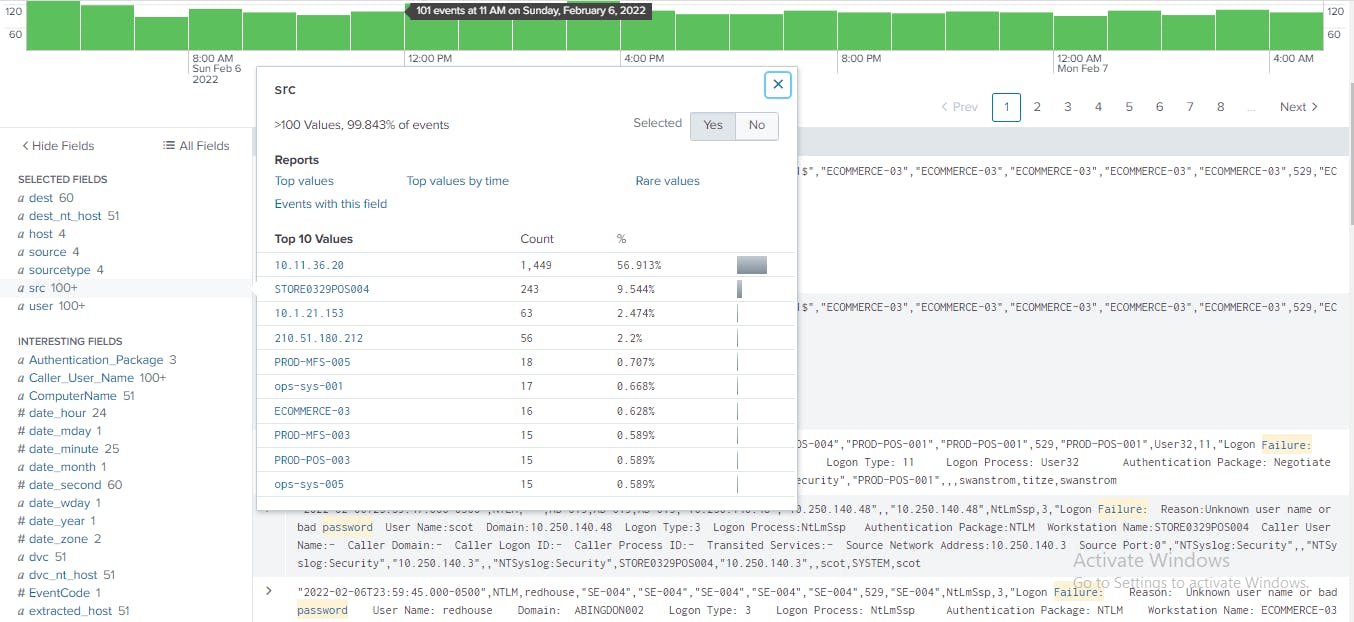
From the Fileds sidebar again, I click src to know the systems the failed authentication attempts originated from. The display shows that the host 10.11.36.20 has the highest activities with password failures, 1449, closely followed by the host STORE0329POS004 with 243 failed access attempts. The host STORE0329POS004 can easily be recognized as a point-of-sale server based on the name. For a host involved in credit card data transactions, this failure authentication attempts are troubling.
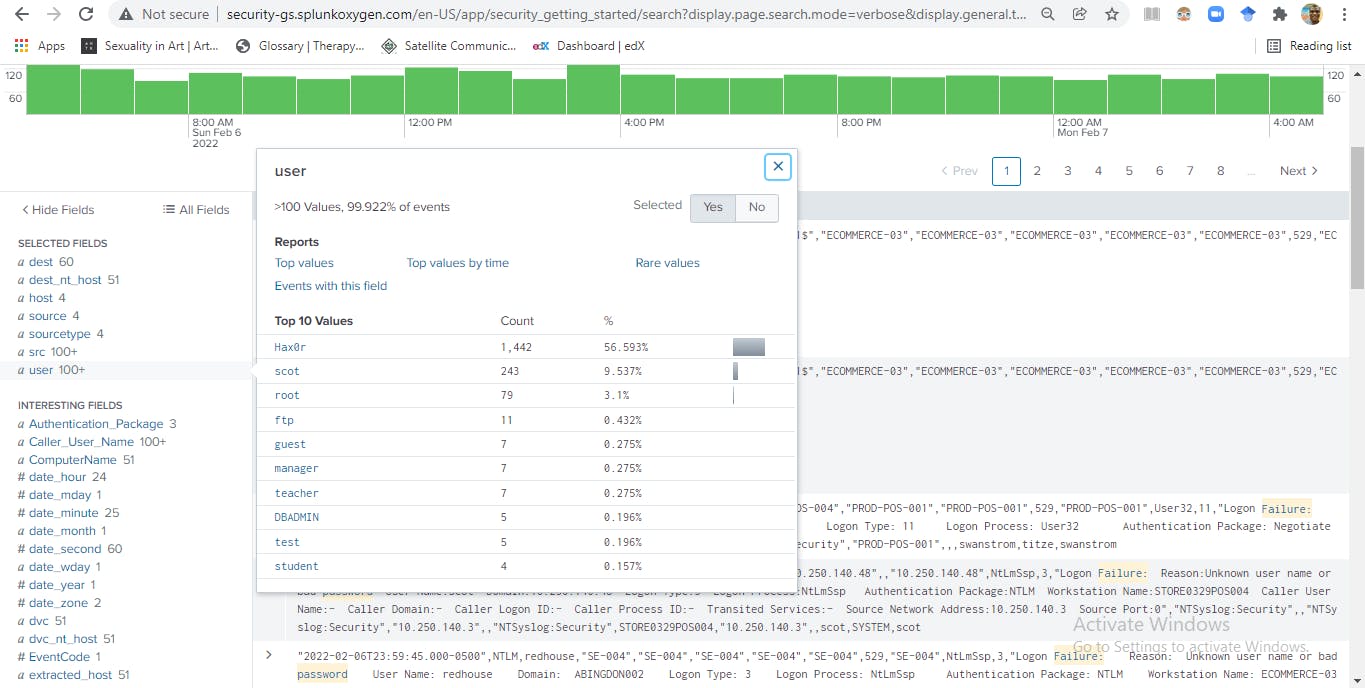
To know the accounts associated with the destination hosts/ systems in the failed access attempts, I clicked users. The account Hax0r has the highest number of authentication failures, followed by Scot as shown below.
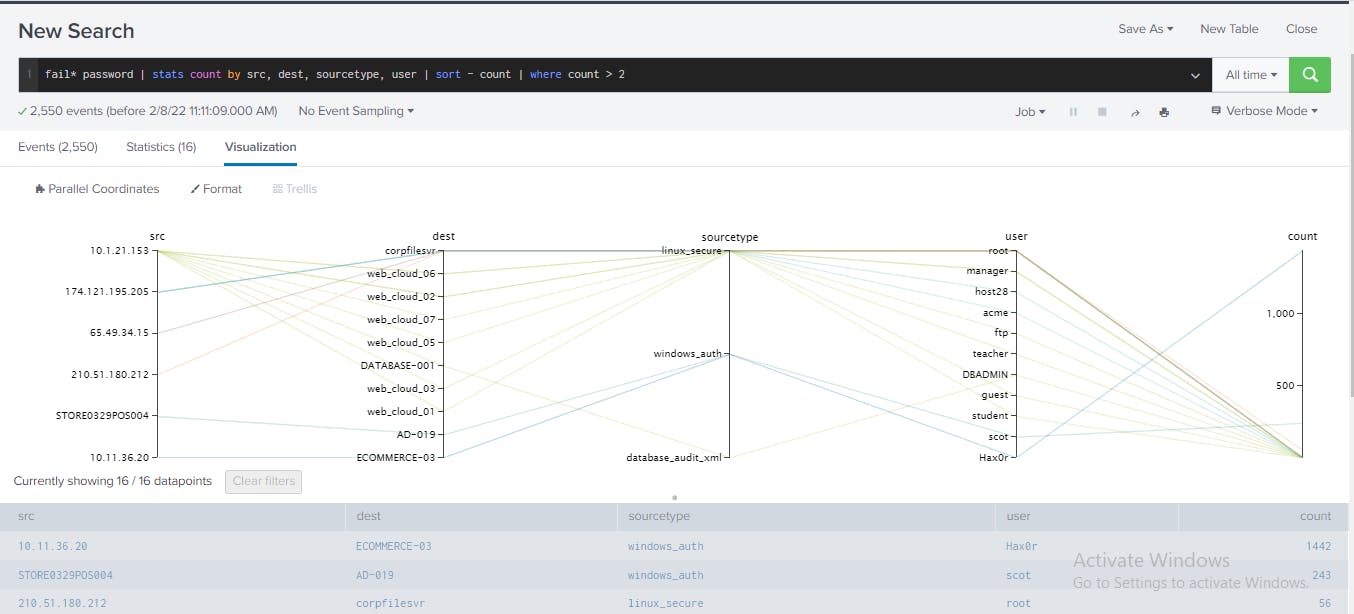
In order to aggregate the authentication failures by the source (src), destination (dst), user, sourcetype, I appended the command, | stats count by src, dest, sourcetype, user to the existing search.
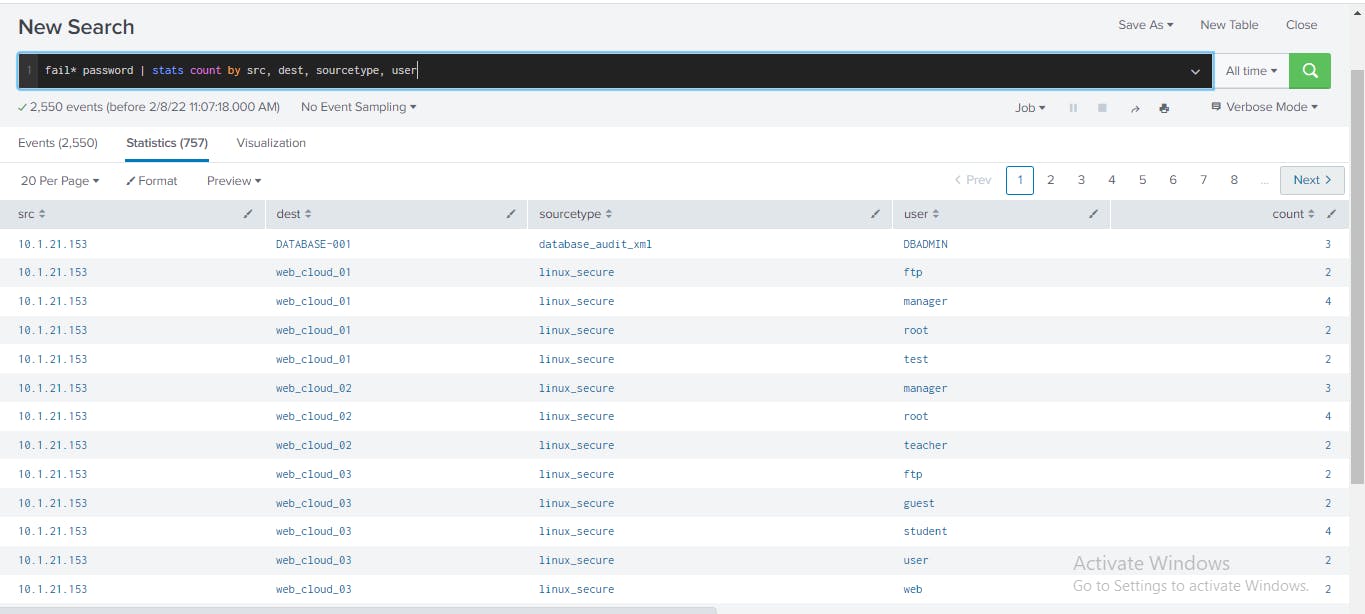
The stats command calculates the total number of authentication failures associated with the src, dest, and user account used to access the destination system.
To focus on failed authentication attempts that are more than one, I appended the command, | sort – count | where count > 2 to the search.
The Sort command displays the highest number of attempts first.
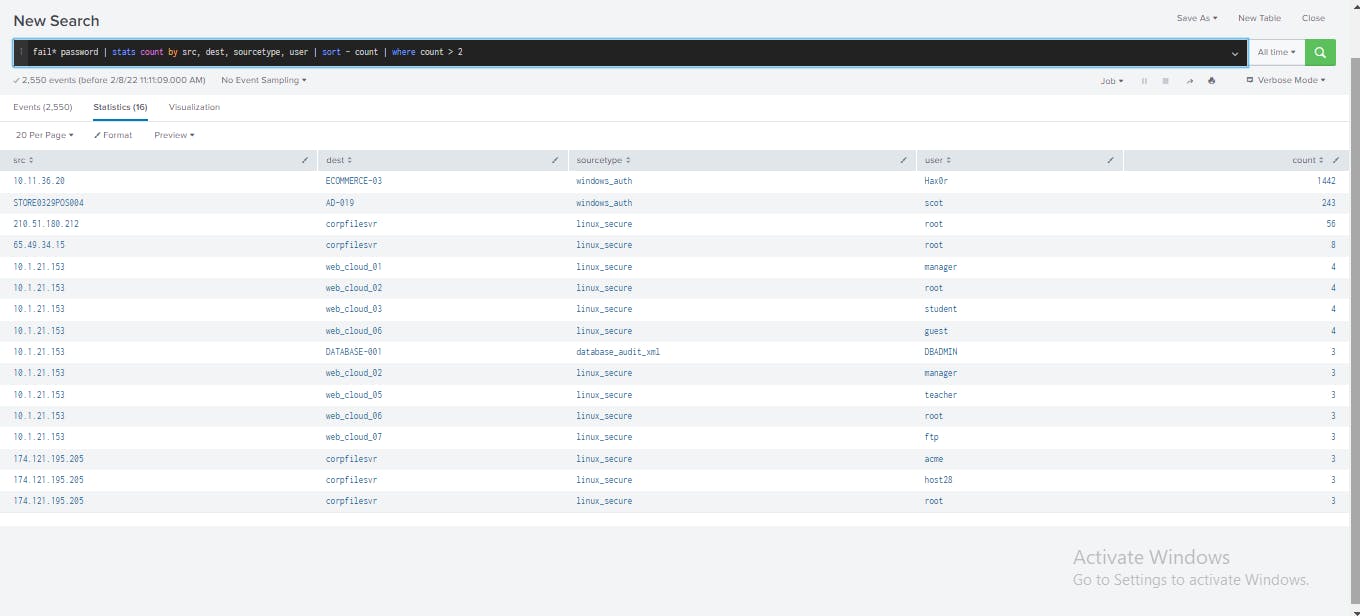
The highest authentication attempt is with the destination hosts ECOMMERCE-03. It is a passible scripted, enumeration attack given the high number of attempts. Another notable thing from the display is that the host 10.1.21.153 attempted to gain authentication access with multiple user accounts. It is likely that an attacker had compromised a host on the network and is now trying to infiltrate other hosts. This pattern indicates lateral movement.
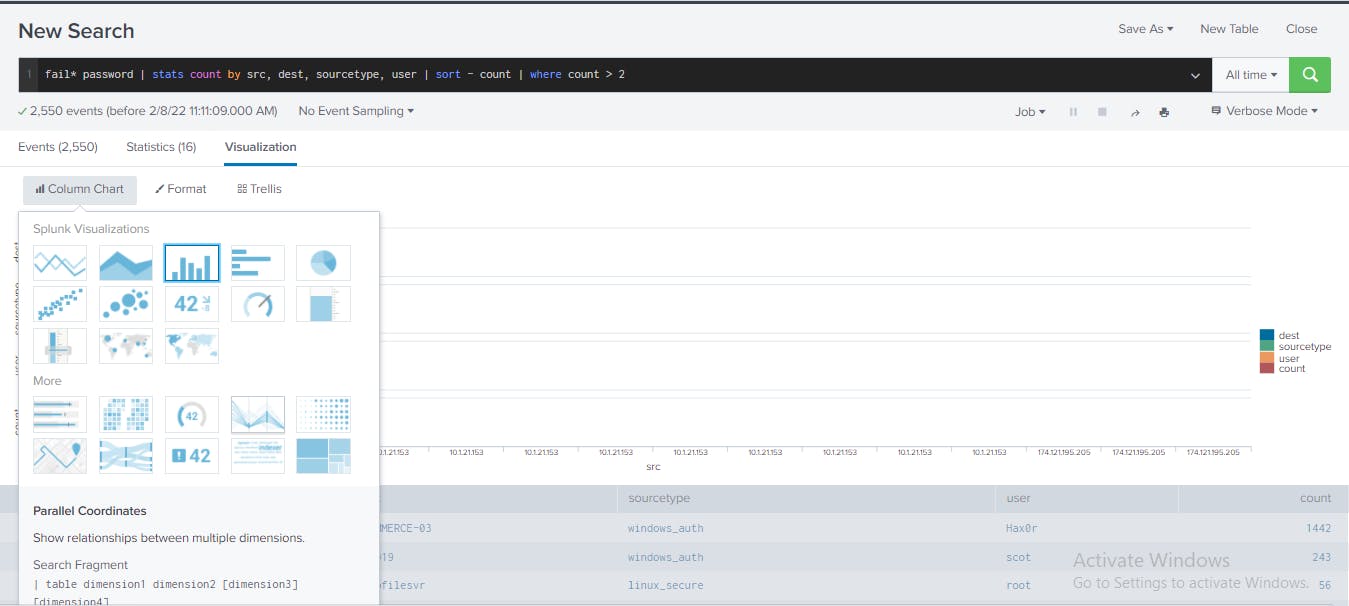
For easier contextual representation of analysis results, I clicked Visualization and then selected "Parallel Coordinates". This showed one-to-many relationship from 10.1.21.153 host to multiple web servers as well as important access records to DATABASE-001 host using DBADMIN credentials.
Validate
To validate the analysis, I continued to investigate the host 10.1.21.153 which attempted to access multiple web servers and a critical database server. My specific objective here is to determine how these attempts took place.
From the earlier analysis table, I clicked the src value for a search result with the host 10.1.21.153 then clicked View Events to see all the authentication failure events associated with that host as shown below.

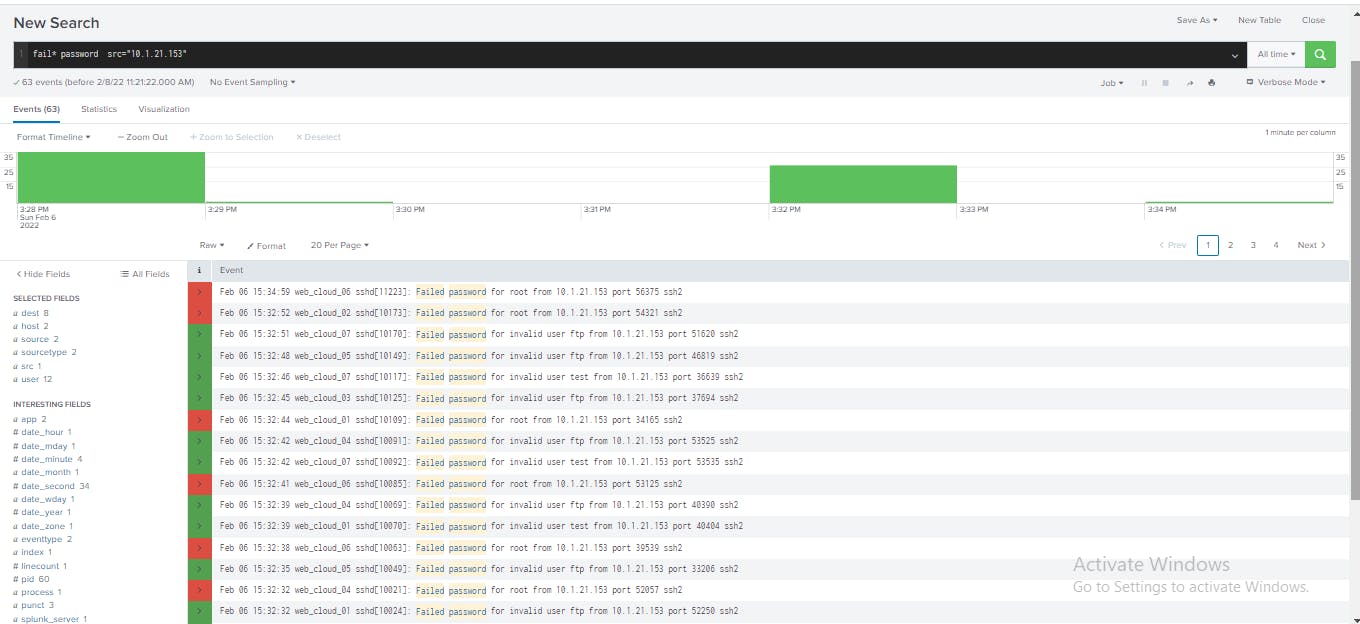
Here, I observed all the raw events associated with this source host, identified patterns of access attempts such as port and protocol used, further information about the user and evidence that there might be a malicious actor trying to access machines in the network.
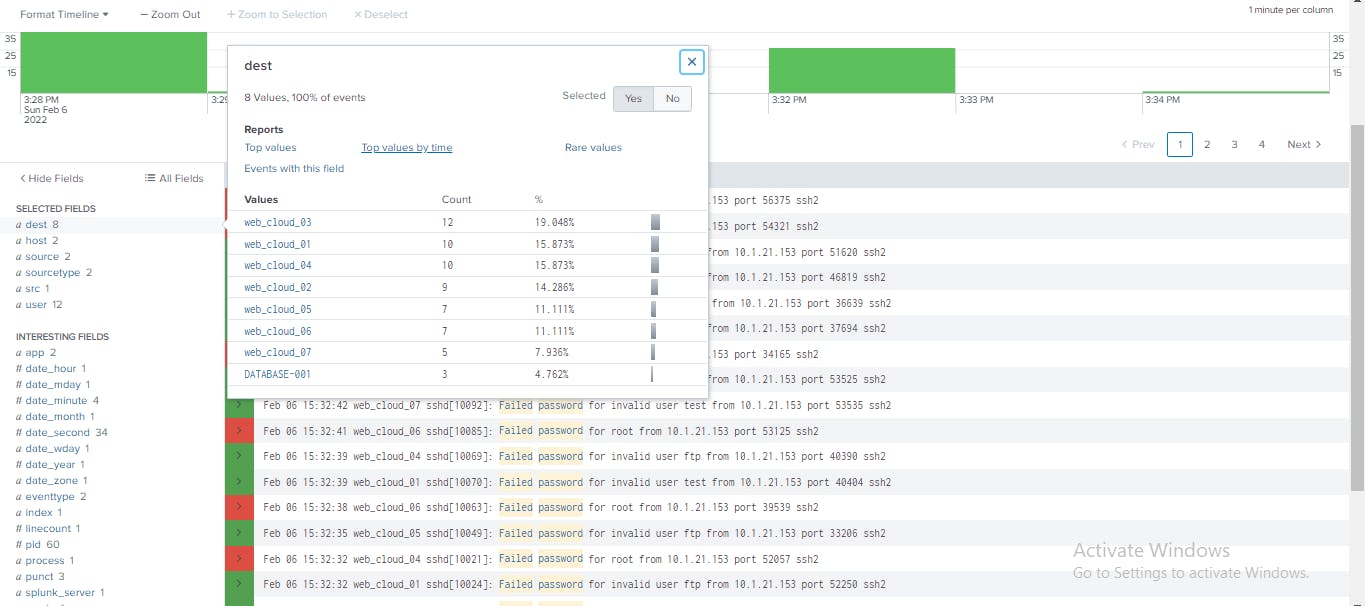
From the Fields sidebar, I clicked the dest field. Then, I clicked Top values by time. The destination (dest) field tells you which systems this particular workstation is targeting. Based on the aggregate number of failed login attempts, web_cloud_03, is the top targeted host with the most failed authentication attempts. Also, acritical asset DATABASE-001 was targeted.
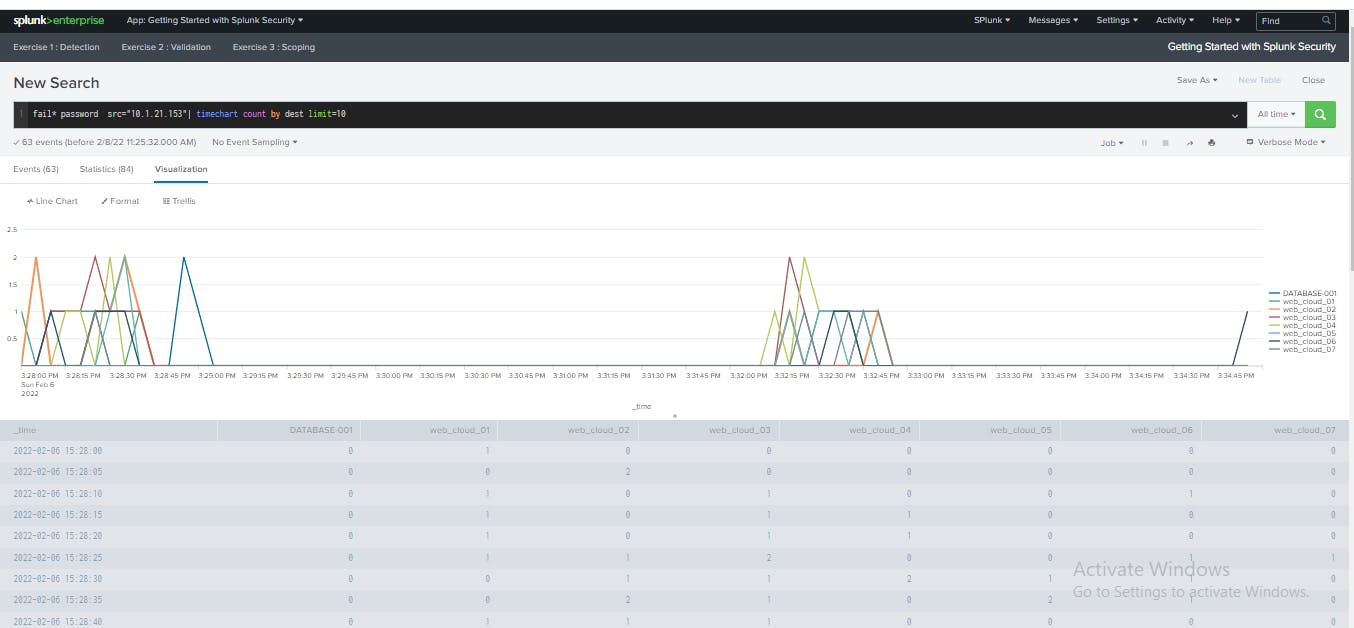
I clicked Line Chart and change the visualization type to Column/Bar. The Column/bar view allows me to easily distinguish the volume of failed authentication attempts by destination.
I clicked Format and then Yes for Multi-series Mode. Multi-series mode displays a separate bar or column for each destination host.
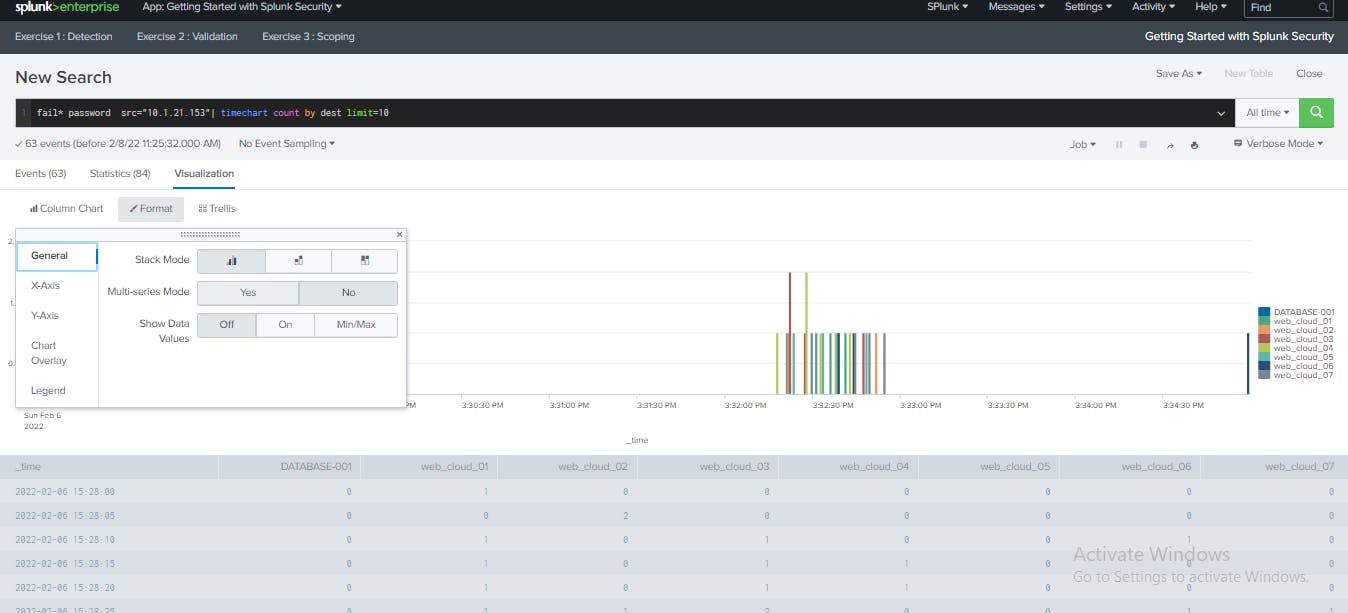
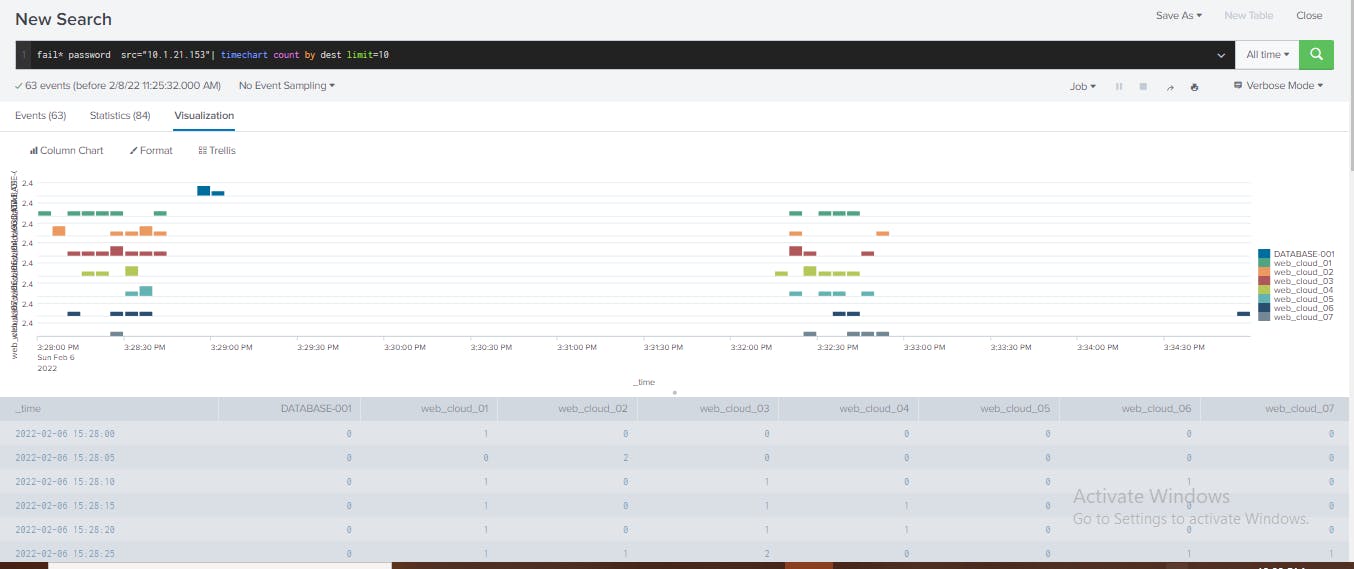
With this, I visualize the volume of attacks from the host 10.1.21.153 organized by destination over time. With this visualization, I can identify the sequence of authentication attempts made by the attacker over time, relative to different assets. Also, the interval and duration of activities involved with the same host. With this analysis, you can identify the following elements that confirm this is a malicious attack on the organization:
A series of brute force authentication attempts to multiple web service hosts.
The attacks on the servers were carried out over two different time intervals. The second series of attacks took place eight minutes after the first.
The attacker attempted to access more critical asset, database server 001 after probing the web servers.
Scoping
Scoping is about knowing the extent of the attack. Here, I want to find out the nature of the malicious activities carried out by the attacker and the effect they have on the work station, in order to determine how to remediate the threat posed by the workstation. To do this, I must determine whether the authentication access attempts were successful, what associated user account and privileges were used and what actions were performed on the target system, DATABASE-001 server?
From the visualization of the workstation 10.1.21.153 activities, I located the events associated with DATABASE-001 on the chart and click the cluster of events on the visualization.
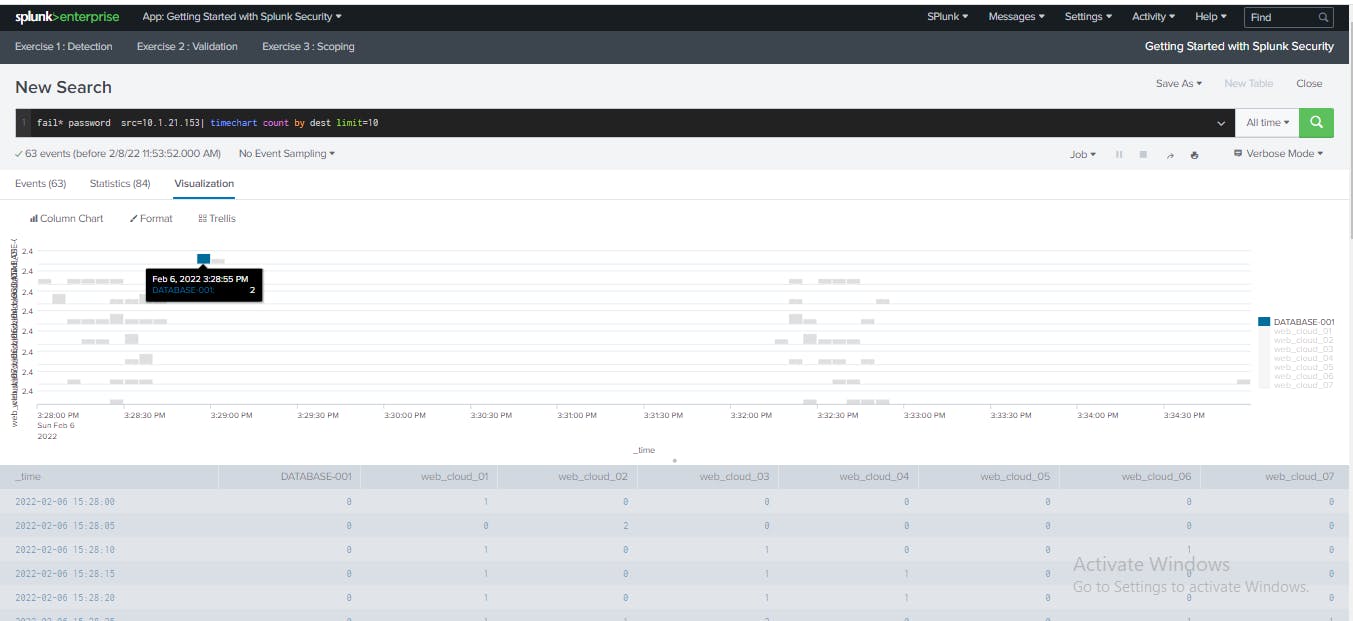
I clicked the host DATABASE-001 to open a secondary search into the specific activities from the source 10.1.21.153 on the database server.
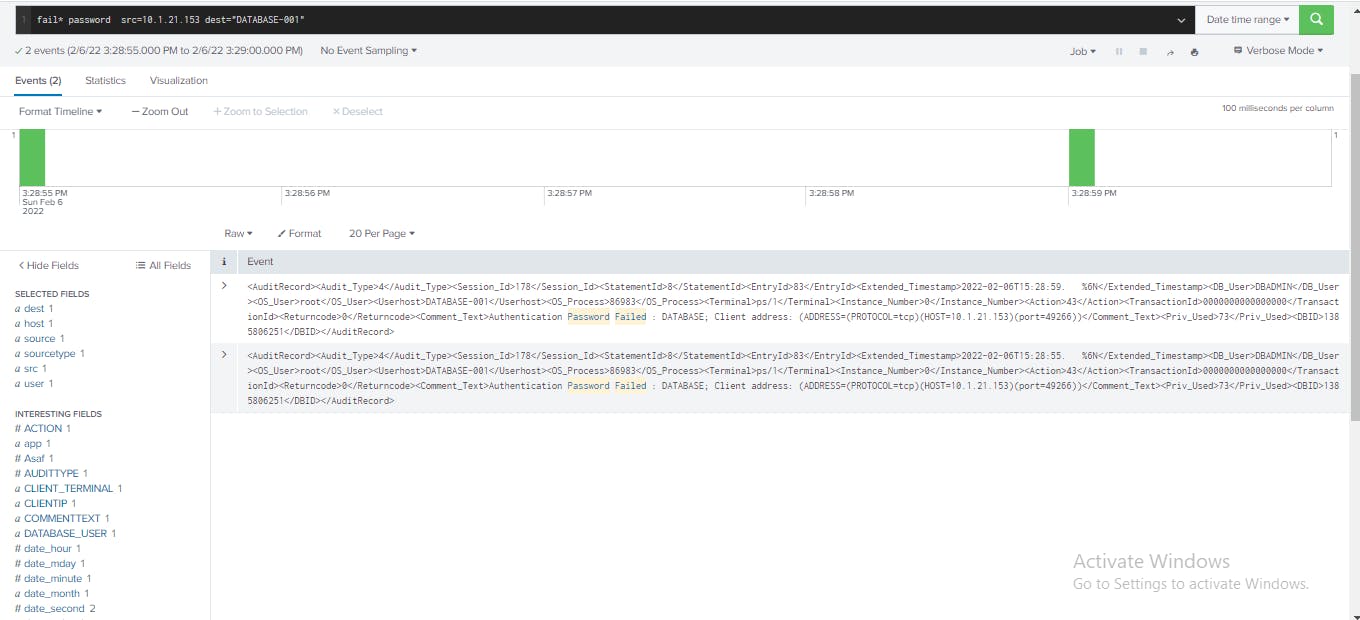 The search results now show only activities between the
 10.1.21.153 host and the DATABASE-001 server that include authentication failures.
To determine the full scope of activities between the 10.1.21.153 host and the
DATABASE-001 server, I expanded the search to determine if there was a successful authentication attempt after the failed authentication attempts I already know about. Also, to determine the associated user accounts used and the activities performed on the server.
I modified the search to remove "fail* password" and see all activities with a "src=10.1.21.153" and a "dest=DATABASE-001".
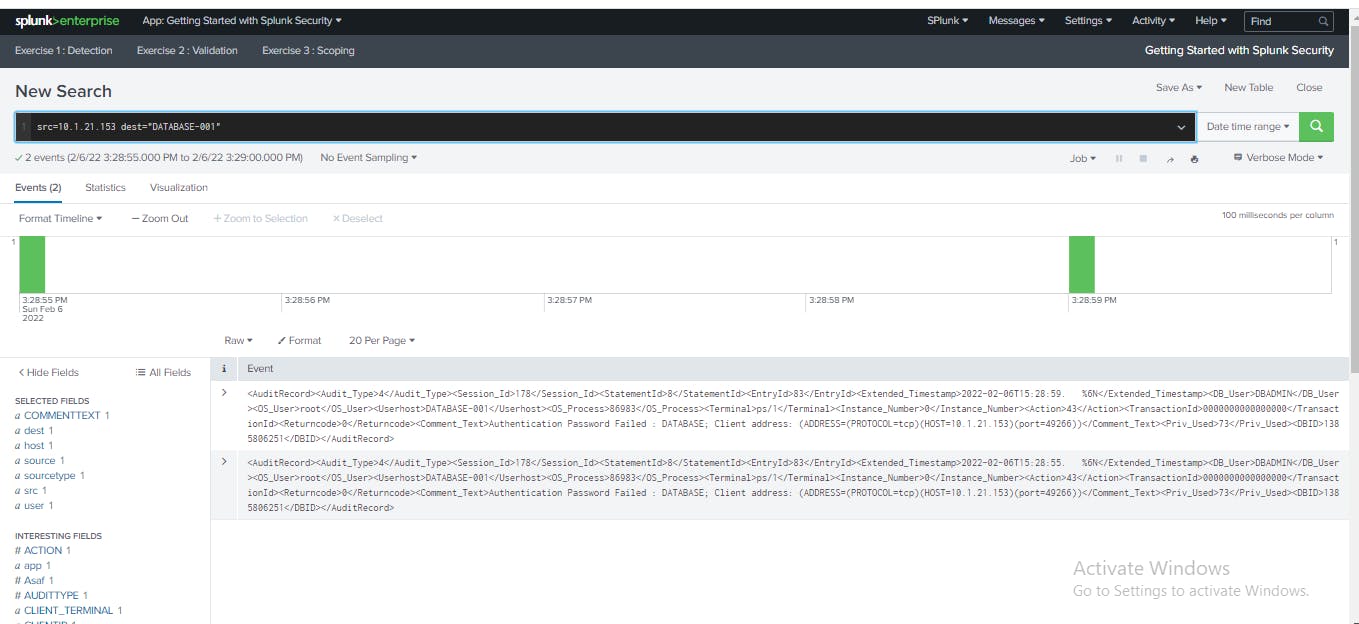
I examined the search results starting with the Fields sidebar. Then I clicked the field COMMENTTEXT to review information about session information on the database server. Afterwards, I clicked Yes to select the field.

I clicked the SQLTEXT field to review information about SQL queries run on the database server. Then I clicked Yes to add the field to the selected fields.
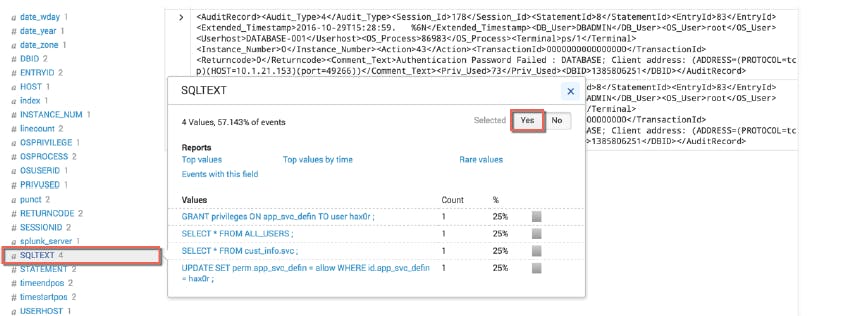
Selecting the fields, COMMENTTEXT and SQLTEXT gives the detail information on what database activities there were between these two hosts.
In the Splunk search bar, I appended "| table _time, src, dest, user, COMMENTTEXT, SQLTEXT" to the search. From this analysis, I can determine that an attack occurred and attackers are querying the database server for valuable information.
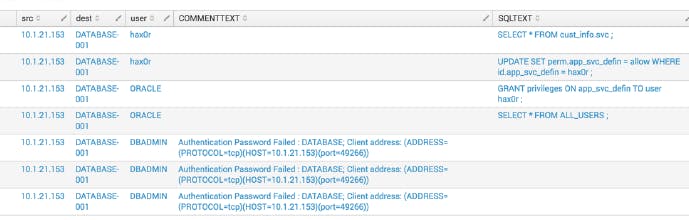 The activities from the workstation indicated that an attacker used several different database credentials to gain access to the database, including credentials from a privileged database user.
After three failed authentication attempts, the attacker successfully logged in to the database as the ORACLE user and successfully gained administrative privileges to the database and modified the user privileges for a third user.
After the user privileges modification, I can identify clear signs of a transaction by the attacker in which they accessed a restricted database table containing customer information.